Car Number Plate Detection Using CNN and Getting Owner Information

What Are we Going to Do?
One can find the code and dataset to create the project in Github repo(link at end). The Project Involve:
- Create a model that will detect a car in a live stream or video and recognize characters on number plate of the car .
- Secondly, it will use the characters and fetch the owners information using RTO API’s.
- Create a Web portal where all this information will be displayed
Note: Training of Model was done on google colab, so don't get confused with the paths.
Step1: Create and Train a Model to Identify Car
Before starting the list of library used in creating our model are as follows:
- codecs
- numpy
- pandas
- cv2
- pytesseract
- matplotlib
- requests
- xmltodict
- json
- torch
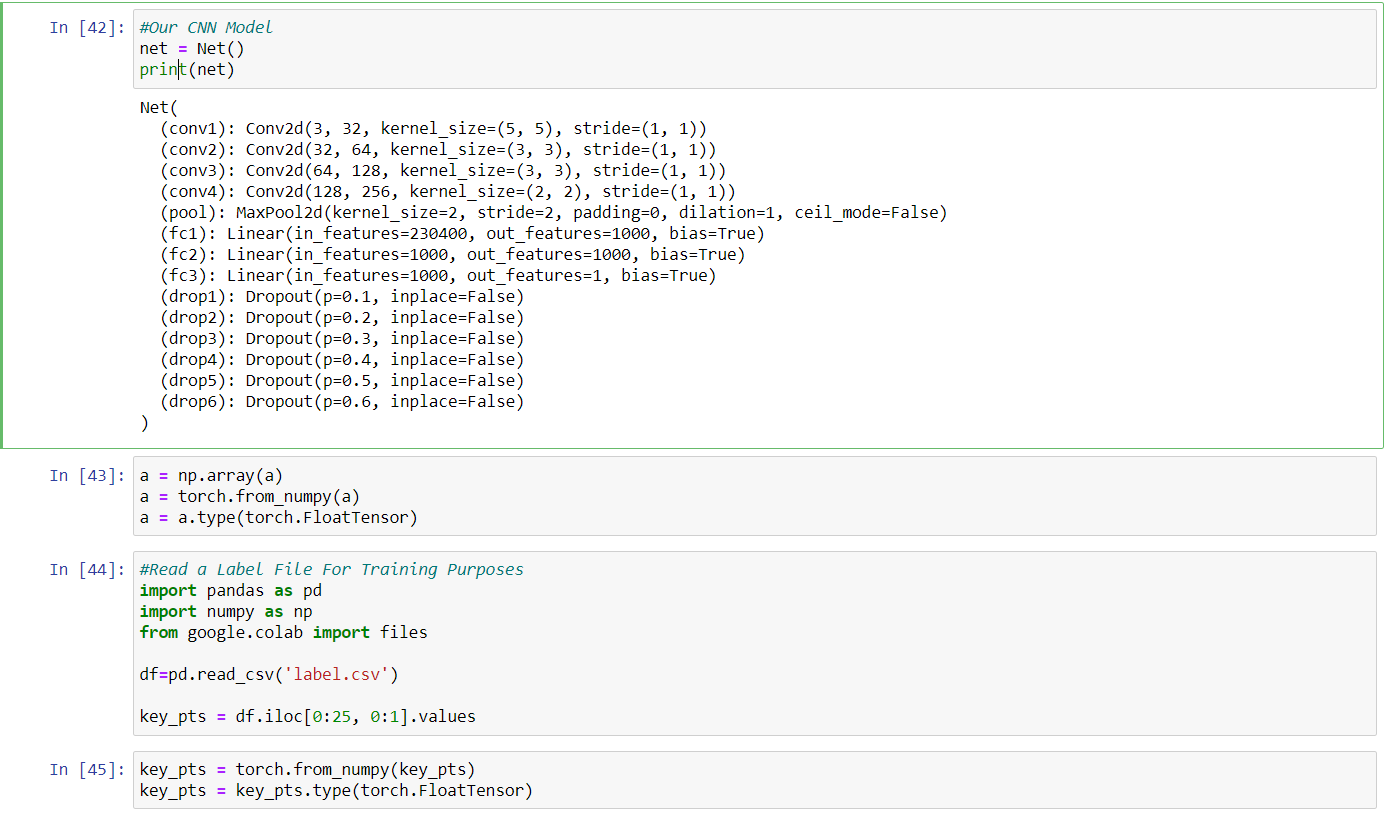
First we will create a empty CNN model that will make use of 4 Convolutional Layers, 1 MaxPooling Layer, 3 Fully connected Linear Layer, 6 Dropout Layers with the help of torch library. The usage is as Follows:
import torch
import torch.nn as nn
import torch.nn.functional as F
# can use the below import should you choose to initialize the weights of your Net
import torch.nn.init as I


class Net(nn.Module):

    def __init__(self):

        super(Net, self).__init__()

        # Covolutional Layers
        self.conv1 = nn.Conv2d(in_channels = 3, out_channels = 32, kernel_size = 5)
        self.conv2 = nn.Conv2d(in_channels = 32, out_channels = 64, kernel_size = 3)
        self.conv3 = nn.Conv2d(in_channels = 64, out_channels = 128, kernel_size = 3)
        self.conv4 = nn.Conv2d(in_channels = 128, out_channels = 256, kernel_size = 2)

        # Maxpooling Layer
        self.pool = nn.MaxPool2d(kernel_size = 2, stride = 2)

        # Fully Connected Layers
        self.fc1 = nn.Linear(in_features = 230400, out_features = 1000) # The number of input gained by "print("Flatten size: ", x.shape)" in below
        self.fc2 = nn.Linear(in_features = 1000,    out_features = 1000)
        self.fc3 = nn.Linear(in_features = 1000,    out_features = 1) # the output 136 in order to having 2 for each of the 68 keypoint (x, y) pairs

        # Dropouts
        self.drop1 = nn.Dropout(p = 0.1)
        self.drop2 = nn.Dropout(p = 0.2)
        self.drop3 = nn.Dropout(p = 0.3)
        self.drop4 = nn.Dropout(p = 0.4)
        self.drop5 = nn.Dropout(p = 0.5)
        self.drop6 = nn.Dropout(p = 0.6)


    def forward(self, x):

        # First - Convolution + Activation + Pooling + Dropout
        x = self.conv1(x)
        x = F.relu(x)
        x = self.pool(x)
        x = self.drop1(x)
        #print("First size: ", x.shape)

        # Second - Convolution + Activation + Pooling + Dropout
        x = self.drop2(self.pool(F.relu(self.conv2(x))))
        #print("Second size: ", x.shape)

        # Third - Convolution + Activation + Pooling + Dropout
        x = self.drop3(self.pool(F.relu(self.conv3(x))))
        #print("Third size: ", x.shape)

        # Forth - Convolution + Activation + Pooling + Dropout
        x = self.drop4(self.pool(F.relu(self.conv4(x))))
        #print("Forth size: ", x.shape)

        # Flattening the layer
        x = x.flatten()
        #print("Flatten size: ", x.shape)

        # First - Dense + Activation + Dropout
        x = self.drop5(F.relu(self.fc1(x)))
        #print("First dense size: ", x.shape)

        # Second - Dense + Activation + Dropout
        x = self.drop6(F.relu(self.fc2(x)))
        #print("Second dense size: ", x.shape)

        # Final Dense Layer
        x = self.fc3(x)
        #print("Final dense size: ", x.shape)

        return x
Now once we created layers for our model, Now is the time to train our model.
First of all we will load our dataset i.e. of 2 types - first containing images of cars with number plate and second dataset containing images of cars which don't have number plate. So that it becomes easier for our model to distinguish frames/images with number plate.
#Read Files Path and Resizing Them
a = []
for i in range(1, 13):
  image = cv2.imread('/content/drive/MyDrive/cars_dataset/' + str(i) + '.png')
  filename = cv2.imread('/content/drive/MyDrive/cars_without_number_plate/' + str(i) + '.jpg')
  image.resize(3, 512, 512)
  filename.resize(3, 512, 512)
  a.append(image)
  a.append(filename)
Load our model in a variable net. Then load a label File that will be used to train our model.
Function to train our model will be as :
#Function To Train Our Model
def train_net(n_epochs, a, key_pts):
    net.train()
    for epoch in range(n_epochs):
        running_loss = 0.0
        for i in range(1):
          output_pts = net(a[i].reshape(1, 3, 512, 512))
          loss = criterion(output_pts, key_pts[i])
          optimizer.zero_grad()
          loss.backward()
          optimizer.step()
          running_loss += loss.item()
          print('Epoch: {}, Batch: {}, Avg. Loss: {}'.format(epoch + 1, i+1, running_loss/10))
          running_loss = 0.0    print('Finished Training')
Now call the training function with train_net(30, a, key_pts).
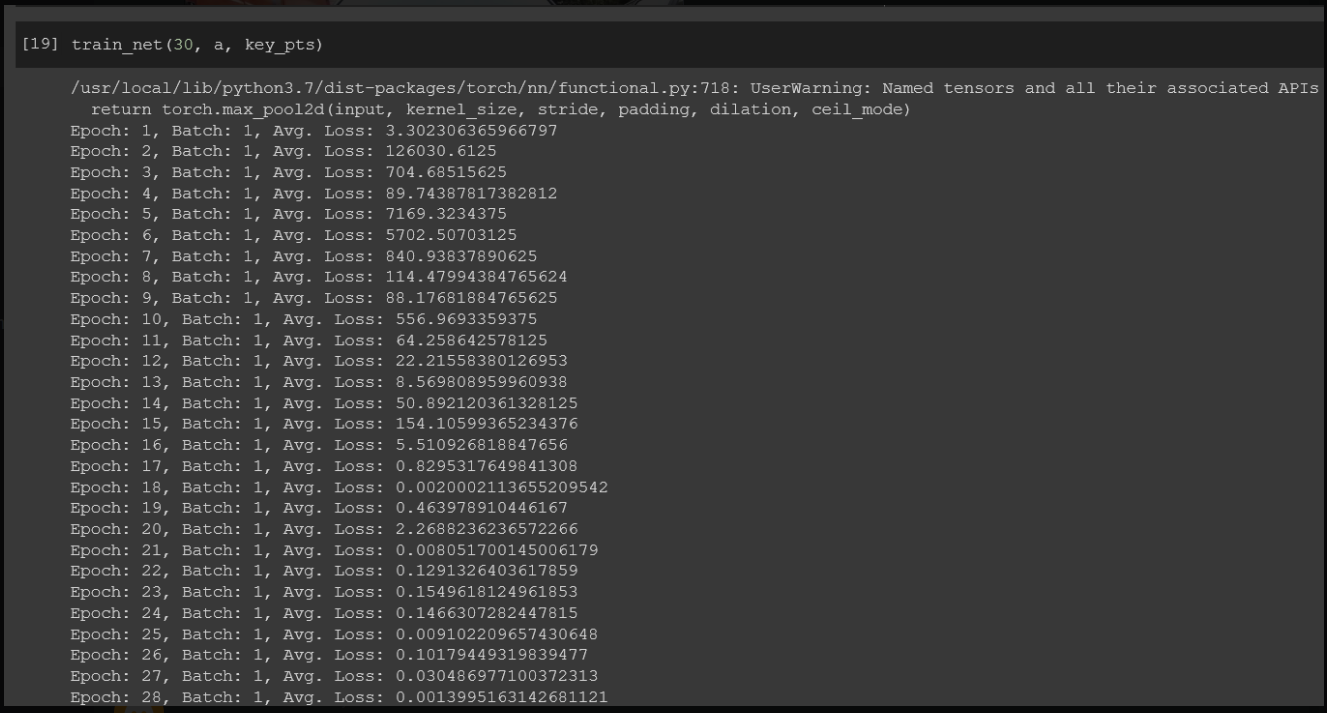
We have now trained our model.
Step-2: Extract License Plate Number From Frame and Call API
So first it will check the frame whether there exist a number plate or not. If it consist of a number plate it will call various function that will be using a haarcascade classifier to obtain only the number plate and then pytesseract will be used to obtain the text from the number plate image. Then we will call the API function to get the car and owner details. The Functions are as:
 The API fucntion is as:
# API function to fetch Details
def get_vehicle_info(plate_number):
    r = requests.get("http://www.regcheck.org.uk/api/reg.asmx/CheckIndia?RegistrationNumber={0}&username=ElSid1".format(str(plate_number)))
    data = xmltodict.parse(r.content)
    jdata = json.dumps(data)
    df = json.loads(jdata)
    df1 = json.loads(df['Vehicle']['vehicleJson'])
    return df1
The code that will be classifying whether there is number plate or not is as:

We have our registration number in the variable text2.
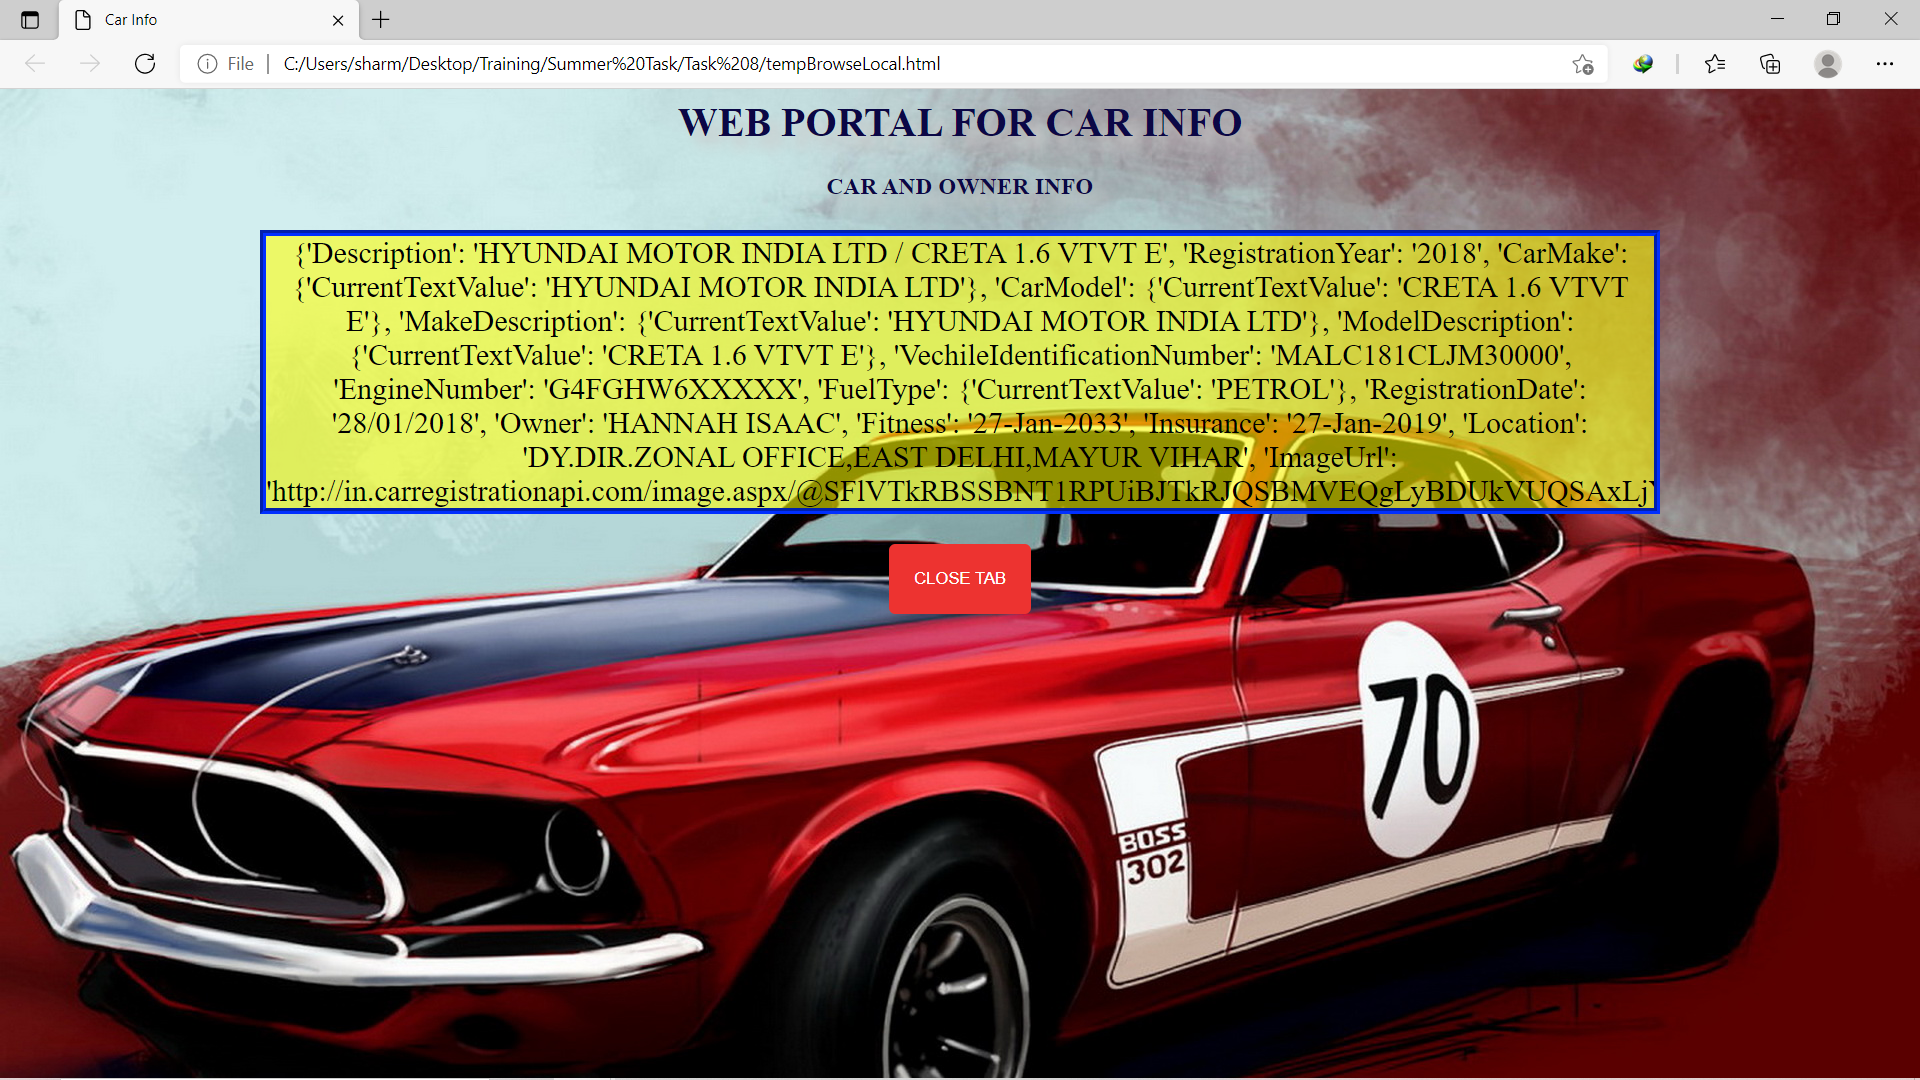
Step-3: Display Information in WEBUI
We will create a Webpage with the help of HTML, CSS and JavaScript inside python code that will display owner information. The code is:
#HTML PAGE to Display Car Owner Information

contents = '''<!DOCTYPE html PUBLIC "-//W3C//DTD HTML 4.01 Transitional//EN">
<html>
<head>
  <meta content="text/html; charset=ISO-8859-1"
 http-equiv="content-type">
 <link rel='stylesheet' type='text/css' media='screen' href='style.css'>
  <title>Car Info</title>
</head>
<body>
    <div class="header">
        <h1>WEB PORTAL FOR CAR INFO</h1>
        <h3>SUBMIT VIDEO OF CAR BELOW</h3>
    </div>

    <p id ="para">'''
content2='''</p>
    <div class="pos">
        <button id="btn">Close Tab</button>
    </div>

</body>
<script>
    var btn1 = document.getElementById("btn");
    btn1.onclick = function () {
        var conf = confirm("Are you sure, you want to close this tab?");
        if(conf == true){
            close();

        }
    }

</script>
</html>
'''

def main():
    browseLocal(contents+text2+content2)

def strToFile(text, filename):
    """Write a file with the given name and the given text."""
    output = open(filename,"w")
    output.write(text)
    output.close()

def browseLocal(webpageText, filename='tempBrowseLocal.html'):
    '''Start your webbrowser on a local file containing the text
    with given filename.'''
    import webbrowser, os.path
    strToFile(webpageText, filename)
    webbrowser.open("file:///" + os.path.abspath(filename))

main()
The Web Page contains a close button to close the TAB opened. The Web Page will look as:
 So in this way we were able to perform Car Number Plate Detection Using CNN and Getting Owner Information. This code has still room for improvement. For getting full details for code can go through the Github Repo.


